

Teach me how
May 12, 2023
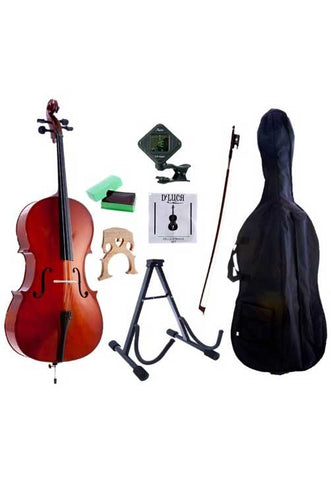
Setting up Your New Cello
for the First Time
Before playing you will need to fully prepare the cello.
Cello Set Up Instructions
Prior to shipping each instrument is inspected by skilled technicians at our distribution center. Cellos are fragile instruments they can easily be damaged in the shipping process, for this reason all Cellos are shipped unassembled, you may need to get your new instrument adjusted by a local technician.

Table of Content
- Cello Bridge
- Sound Post
- Tuning
- Cello Pegs
- Cello Bow
- Maintenance
Getting Started
Cello Bridge
The bridge is very important in transmitting the sound of your cello. It serves as the conduit between the strings and the body of the instrument. Many advance players prefer to have their bridges "customized" by cello luthier in order to draw out an even better tone from their instrument. If you desire this please visit your local cello repair shop for information.
The bridge is not in a fixed position. It is held in place with the tension of the strings over the top edge. Your bridge may not be set. If it is proceed to the tuning section.
If your bridge is not set you will need to set it by following the simple instructions below:
Loosen strings if necessary. You will need some tension on the strings in order to keep the bridge
in place.
Position the bridge so the higher side of the bridge is under the low strings (C string side). Align the feet of the bridge with the two notches on the inside of the "F" holes and evenly with
the fingerboard. Tilt the bridge up under the strings toward the tailpiece and set at a 90 angle. If you cannot tilt the bridge up because the strings are too tight, loosen them slowly and just enough so you can hold the bridge in place.
Align the strings so they are evenly spaced on the bridge, Tighten the strings by turning pegs and pushing in towards the peg box in order to hold the bridge in place. If the pegs are slipping please refer to Pegs section below for simple solutions.
If the bridge begins to tilt forward you can very carefully pull it back towards the tailpiece. Keep in mind that not all players have the same size hands and fingers. Cellos come with the bridge not set at the correct height for the player and need to be adjusted. If this is the case then a professional luthier should adjust the bridge to get it easiest to play. Cost should be minimal unless the pro wants to do more work on the cello. Tell them to only do what is vital to allow the cello to be played easily, not an extensive setup to maximize its sound quality - unless you're ready to spend that money.
Sound Post
The sound post is vital to producing any sound from your new instrument. It serves as the conduit between the bridge, strings, and body of the instrument and is located in the inside of the body, visible through the "F" holes. The sound post on your instrument must be set in the correct position by a skilled technician using special tools. During shipping it is possible for the sound post to come loose or dislodge itself. If this happens, please see a local luthier or repair technician. Harm can be done to your cello if the sound post is set improperly that is not covered by warranty.
Tuning
Once the bridge is set you are ready to bring your cello up to pitch. If you are new to the cello we suggest you have your instructor assist you with tuning. The strings are delicate and if tightened too tight can snap and cause damage to your new instrument. As you are tightening the strings to correct pitch keep pulling the top of the bridge back toward the tailpiece. It will tend to lean toward the fingerboard as you tighten the strings. If you let it lean too far it will SLAM down and could result in damage to your instrument.
The cello notes are C-G-D-A from low to high, Use a pitch pipe or an electronic tuner for reference, Start by tuning the C string first. The C string is the first string from the left as you are looking at the cello. If you are using a pitch pipe blow into it to produce a C note, Pluck the string and adjust the tension of the string with the peg to get relatively close to the pitch. You will need to push the pegs in toward the peg box. You will need to continue to pluck or play the string, all the while keeping the C pitch in your ear or blowing into the pitch pipe in order to get the pitches to match, or pluck and play until your tuners shows that you are close to pitch. Once you are close you can use the fine tuner that is located on the tailpiece to get an exact match of pitches.
Repeat the steps above to tune the remaining strings in the following order: G, D and A.

Things to keep in mind
Adjust the pegs to make larger adjustments and the fine tuners to make smaller adjustments.
Tighten the tuning pegs by turning the G clockwise you will need to push the pegs in towards the peg box in order to lock the strings in place. Depending on the weather (temperature and humidity level), as well as the amount and type of playing, you may need to retune the instrument frequently (for example, every 15 minutes to a half an hour). In ideal conditions, this will not be necessary, but do check periodically to see that your cello is still in tune.
Strings take some time to wear in. New strings tend to loose their tension more than older strings. When you get your new strings to pitch you may want to slightly pull on them to help them stretch out and settle in. After pulling on the string you most likely will need to re-tune it. It is easier to arrive at the desired pitch from below the note. If the string pitch is sharp (high) loosen the string slightly until the string pitch is flat (low). Slightly tighten the peg until you arrive at the
desired pitch. It will take some practice going back and forth before you can quickly tune a string, but in time, you will master the slight adjustments needed instinctually and be able to tune the instrument without thinking it through step by step.
Pegs
If the pegs are slipping you can do the following:
Be sure to push the pegs in as you tune the strings up to pitch. This ensures that the pegs hold tighter as the tension of the string goes up. Use peg compound to help lock the pegs in place. You can also apply chalk onto the pegs where it is inserted into the peg box. New strings will require some stretching before they settle in and hold pitch. Try pulling the strings slightly upwards after tuning to pitch. This can take some of the slack out of the strings and help accelerate the settling in process for new strings.
Bow
The bow must be tightened and rosined in order to product a sound with it. To prepare your bow follow the steps below:
Use the screw to tighten the frog so that the hair has tautness. Be careful to not over tighten your bow. The hair should have a slight bounce to it without touching the stick after placing it on the strings. Usually about 1/4 of an inch distance from the low point of the curve to the hair is ideal. For some it is more and some it is less depending on how the player plays.
A new rosin cake will be too slick to apply to the hair. To correct this, take a small pocketknife and cut three or four parallel lines in the rosin so that there will be some texture to the cake. You can also roughen the surface of the rosin cake with some sandpaper. Slowly draw the hair over the rosin cake from the frog to the tip of the bow. Be careful not to draw the bow too quickly, which would cause some friction.
On a new bow, you may have to repeat this process approximately 5-10 minutes...test the bow to determine if the rosin is adhering to the hair. If it is, you'll start to hear a clear pitch emitted as the bow is drawn over the strings. Try placing the bow on your strings and play a few notes open.
If there is no tone or volume emitting from the strings the bow is not grabbing the strings enough to generate a tone, try applying more rosin. Follow this process repeatedly until the bow no longer slides on the strings, and you're getting a clear tone.
Things to keep in mind
Adjust the pegs to make larger adjustments and the fine tuners to make smaller adjustments.
Tighten the tuning pegs by turning the G clockwise you will need to push the pegs in towards the peg box in order to lock the strings in place. Depending on the weather (temperature and humidity level), as well as the amount and type of playing, you may need to retune the instrument frequently (for example, every 15 minutes to a half an hour). In ideal conditions, this will not be necessary, but do check periodically to see that your cello is still in tune.
Strings take some time to wear in. New strings tend to loose their tension more than older strings. When you get your new strings to pitch you may want to slightly pull on them to help them stretch out and settle in. After pulling on the string you most likely will need to re-tune it. It is easier to arrive at the desired pitch from below the note. If the string pitch is sharp (high) loosen the string slightly until the string pitch is flat (low). Slightly tighten the peg until you arrive at the
desired pitch. It will take some practice going back and forth before you can quickly tune a string, but in time, you will master the slight adjustments needed instinctually and be able to tune the instrument without thinking it through step by step.
Pegs
If the pegs are slipping you can do the following:
Be sure to push the pegs in as you tune the strings up to pitch. This ensures that the pegs hold tighter as the tension of the string goes up. Use peg compound to help lock the pegs in place. You can also apply chalk onto the pegs where it is inserted into the peg box. New strings will require some stretching before they settle in and hold pitch. Try pulling the strings slightly upwards after tuning to pitch. This can take some of the slack out of the strings and help accelerate the settling in process for new strings.
Things to keep in mind
There's a happy medium you're trying to attain when applying rosin. Listen for a nice clear tone as the bow draws on the strings. If there's a whispering tone or no tone at all, add more rosin. If there's a clear tone, you should have the optimal level of rosin on the bow. If there's a scratchy tone, stop applying your rosin and start playing. If you start to hear a scratchy tone, instead of a nice clear tone, you may have applied too much rosin. If so, simply play until the rosin slowly wears off. When your practice session is over loosen the screw so that the hair is no longer taut and return your bow to its case. This will help you prolong the life of your bow. Never touch the horsehair on your bow. The oils from your skin will damage the hair and take away its ability to grab the strings.
End Pin
Use the end in to adjust the height of your cello while sitting on an armless chair with your feet flat on the floor. Adjust the height so that the bottom peg on the top is at the same level as the ear.
Maintenance
Always keep your instrument and bow in its case with the lid closed when not in use. Also, be sure that you securely lock the bow in place and remove the shoulder rest or pad before closing the case. Careless accidents could leave your instrument seriously damaged.
Pegs
If pegs start to slip push the peg in towards the peg box to get a better grip. Use peg compound to help lock the pegs in place. You can also apply chalk onto the pegs where it is inserted into the peg box. You should apply peg drop every couple of months. Over time, all pegs and the peg box become worn. When this happens, it is time to bring the instrument to a professional repairperson for refitting.
Body
Never use furniture polish or alcohol to clean your instrument. Always clean your cello after playing. Keep a lint-free cloth inside your case and wipe off all the rosin dust and dirt from your instrument after each time you play. Pay particular attention to the fingerboard and the top of the instrument. If rosin dust accumulates and is not wiped off it will fuse with the varnish, and become impossible to remove without damage. Be careful not to knock the bridge out of place while cleaning.
The Bow
The bow should not be used on anything or for anything other than the strings of a stringed instrument. Never touch the horsehair on your bow. The oils from your skin will damage the hair and take away its ability to grab the strings. Rosin the bow regularly. For students it is probably sufficient to rosin the bow once a week. Too much rosin will produce a harsh tone and cause an excessive build-up of white rosin powder on the instrument.
When your practice session is over loosen the screw so that the hair is no longer taut and return your bow to its case. This will help you prolong the life of your bow. You should loosen the hair completely then bring it back with just a single turn of the screw. The goal is to "keep the hair even but allow the bow to relax". Bows must be periodically re-haired. Professional repair technicians should perform this. Re-hairing is done when too many of the hairs are broken, or the hair is dirty, or has lost its friction. Sometimes changing the whole bow can be easier and cheaper than re-hairing the old bow, especially with small fractional sized bows.
Bows sometimes lose their correct camber and need to be re-cambered using the same heating method as is used in the original manufacture. Professional repair technicians should perform this. A bow stick should be wiped clean after every use. A soft, non-abrasive, clean cloth (lint free) with no oils or chemicals of any kind should be used. There are special untreated cloths marketed for the cleaning of instruments and bows; there are also many types of cleansers and polishes for stringed instruments that can be used on bows. If the bow is wiped properly after every use, cleansers and polishes are pretty much unnecessary. (If you feel the need to polish your bow stick, first use a drop on a small area of the stick to make sure it won't damage or discolor your finish.) Never use any kind of commercial cleanser on a bow (or stringed instrument) and keep all chemicals, cleansers etc. away from the hair. Grip or winding of the bow must occasionally be replaced to maintain a good grip and protect the wood.
Strings
Always clean your cello strings after playing. Keep a lint-free cloth inside your case and wipe off all the rosin dust and dirt from your strings after each time you play. This will make a striking difference to the sound.
Strings will slowly deteriorate. Usually, within six months they start to lose much of their tone quality and begin to sound dull and dead. This occurs even if the cello is not being played. Old strings are lifeless and dull sounding. They should be replaced with new strings. The finest instrument will not sound good with poor strings. The strings should be replaced one at a time.
When you need to change an entire set of strings, do not remove all of the old strings at one time. This will cause you to lose the correct bridge placement and the lack of tension can cause the sound post to fall over.
To change your strings follow the steps below:
Adjust the fine tuner so that it is in the middle of its range. Insert the ball end of the string around the hooks of fine tuner and lightly pull. Insert the other end of the string through the hole in the peg and wind it by turning the peg clockwise. Align the string on the bridge by running it through the groove that was made from the old string. Wind the string evenly from the center of the peg to just before the edge of the peg box. Tighten the string until you get close to the desired pitch.
Use the fine tuner to lock the string into pitch. Check the bridge's adjustment, guarding against the edge being pulled toward the fingerboard excessively while bring the new strings up to pitch gradually.
Things to keep in mind
New strings may break after installation. If this happens be sure to take note of where the string broke. This can be caused by a variety of reasons:
A cello can develop a rough spot at the peg, the nut, or the fine tuner if the winding of the string is too close to the wall of the peg box. It may be under too much tension and stress, causing it to snap. If you are suffering from either slipping or tight pegs please see above for details of how to remedy the problem. Remember that after you have put them on, strings will slowly deteriorate. Usually, within six months they start to lose much of their tone quality and begin to sound dull and dead. This occurs even if the cello is not being played. Even unused strings. In their packages lose their quality after a while. Often, trying different strings can make a significant contribution to improving the sound of your Instrument.
Your cello is a fragile instrument and requires service on a regular basis. We recommend that you visit a skilled repair shop at least twice a year to have your instrument checked. An inexpensive, early repair can save you the expense of a major repair or overhaul.
Restrictions:
Warranty does not cover strings, reeds, cases or other free accessories
Damage caused by neglect or misuse of instrument is not covered
Delicate instruments are affected by climatic conditions. Exposure to excessive heat, cold, dryness, or moisture is considered neglect
Instrument adjustment is not covered
Normal wear caused by normal use of items is not covered
Natural products, such as wood, cannot be guaranteed against cracking, seam separation, warping of fingerboard or chipping.
Top Popular Products
D'Addario Eclipse Cello/Bass Tuner, Black
D’Addario electronic tuners are designed by musicians for musicians featuring intuitive features, easy to read displays, and exceptional tuning accuracy. Affordable no longer means compromise. Introducing the D’Addario Eclipse Tuner—the modestly-priced tuner with unparalleled performance. The Eclipse chromatic clip-on tuner offers fast, accurate chromatic tuning on and off the stage.
D'Luca Mini Clip-On Tuner
The D'Luca Mini Clip-On Chromatic Tuner is the ideal choice for any musician. Tune your Guitar, Bass, Violin, Ukulele, Cello, Viola, Bajosexto or any instrument you want with this affordable Clip-On Chromatic Tuner. Accurate tuning, LCD display shows easy-to-read frequency lines white when out of tune and bright green when in tune.
People Also Read
Bach Trumpet, Cornet and Fluegelhorn Mouthpieces
The history of Bach Trumpet, Cornet and Fluegelhorn Mouthpieces starts with mouthpieces. A century ago, trumpet player Vincent Bach began experimenting with designs and manufacturing processes to replace a broken mouthpiece

Selmer Clarinet and Saxophone Mouthpieces
When selecting a mouthpiece, it is necessary to take into account both the musician and the instrument. Although seemingly simple in shape, the mouthpiece is actually quite complex and crucial to getting good results
Parduba Mouthpieces comparison Chart
John Parduba started making custom mouthpieces in 1915 then opened his original shop at 3rdAve, & 87 St., NYC. In 1918 where he fabricated trumpets and cornets of premium quality in addition to his mouthpieces and repair work.

great information, thank you for you help